Kali#
系统配置#
换源#
sudo vim /etc/apt/sources.list
中科大源
deb http://mirrors.ustc.edu.cn/kali kali-rolling main non-free contrib
deb-src http://mirrors.ustc.edu.cn/kali kali-rolling main non-free contrib
清华源
deb http://mirrors.tuna.tsinghua.edu.cn/kali kali-rolling main contrib non-free
deb-src https://mirrors.tuna.tsinghua.edu.cn/kali kali-rolling main contrib non-free
阿里源
deb http://mirrors.aliyun.com/kali kali-rolling main non-free contrib
deb-src http://mirrors.aliyun.com/kali kali-rolling main non-free contrib
官方源
deb http://http.kali.org/kali kali-rolling main no-free contrib
deb-src http://http.kali.org/kali kali-rolling main non-free contrib
完成之后按 esc 再输入 即保存退出
再进行更新
sudo apt update
sudo apt upgrade -y
sudo apt dist-upgrade -y
sudo reboot now
Root 登陆#
- 先修改默认 root 密码
sudo passwd root
apt-get install kali-root-login命令安装软件包。
安装完成后,输入命令passwd修改 root 密码。
init 6重启后使用 root 登录。
装网卡驱动#
sudo apt install realtek-rtl88xxau-dkms -y
sudo apt install dkms -y
git clone https://github.com/aircrack-ng/rtl8812au
cd rtl8812au/
make
sudo make install
检查一下
lsusb
iwconfig
完成之后测试一下
sudo wifite
显卡驱动#
部分使用 nvidia 显卡的计算机在安装 kali 后会产生缺少驱动不兼容的情况。解决这一问题可参考如下步骤:
apt-cache search linux-image
apt-get install linux-image-xxx linux-header-xxx
init 6
echo -e "blacklist nouveau\noptions nouveau modeset=0\nalias nouveau off" > /etc/modprobe.d/blacklist-nouveau.conf
update-initramfs -u && reboot
apt-get install dkms
下载 nvidia 相应的驱动程序后,用以下命令执行安装。
./NVIDIA-Linux-x86_64-470.74.run #全部选是即可
安装驱动后需要编辑一些配置文件
vi /etc/X11/xorg.conf
Section "ServerLayout"
 Identifier "layout"
 Screen 0 "nvidia"
 Inactive "intel"
EndSection

Section "Device"
 Identifier "nvidia"
 Driver "nvidia"
 BusID "PCI:1:0:0"
EndSection

Section "Screen"
 Identifier "nvidia"
 Device "nvidia"
 Option "AllowEmptyInitialConfiguration"
EndSection

Section "Device"
 Identifier "intel"
 Driver "modesetting"
EndSection

Section "Screen"
 Identifier "intel"
 Device "intel"
EndSection
vi /usr/share/gdm/greeter/autostart/optimus.desktop
[Desktop Entry]
Type=Application
Name=Optimus
Exec=sh -c "xrandr --setprovideroutputsource modesetting NVIDIA-0; xrandr --auto"
NoDisplay=true
X-GNOME-Autostart-Phase=DisplayServer
vi /etc/xdg/autostart/optimus.desktop
[Desktop Entry]
Type=Application
Name=Optimus
Exec=sh -c "xrandr --setprovideroutputsource modesetting NVIDIA-0; xrandr --auto"
NoDisplay=true
X-GNOME-Autostart-Phase=DisplayServer
init 6
以上命令中,执行apt-cache search linux-image命令可检索 kali 系统最新版本内核。系统内核是操作系统最基本的部分。在 linux 环境中,某些软件和驱动在安装过程中需要调用最新的内核版本。因此我们需要找到最新版本系统内核并安装升级。
执行apt-get install linux-image-xxx linux-header-xxx命令以安装 kali 最新版本内核,其中 xxx 代表内核版本。如下图:

安装新的内核之后需要重启电脑,其余命令按上文顺次执行即可。
ssh#
可使用systemctl命令查看和设置 openssh 服务的状态。
systemctl status sshd.service    #查看ssh状态
systemctl enable sshd.service    #开启ssh自启动
systemctl start sshd.service     #启动ssh服务
systemctl stop sshd.service      #停止ssh服务
配置免密码(公私钥认证)登录
ssh-keygen命令生成公钥 / 私钥对
进入根目录文件夹内可以看到如下密钥文件
  id_rsa        #私钥
  id_rsa.pub    #公钥
vi /etc/ssh/sshd_config,将文本中有关PubkeyAuthentication和AuthorizedKeysFile的条目修改为如下内容:
PubkeyAuthentication yes
AuthorizedKeysFile      .ssh/authorized_keys
重启服务
A 机器(客户机)使用ssh-copy-id [user]@[host]命令拷贝密钥文件到 B 机器(服务器)。
随后客户机访问服务器,我们会发现直接无密码登录。
Tmux#
nano ~/.tmux.conf
#tmux attach 如果无分离终端则新建
new-session
# split panes using | and -
bind | split-window -h
bind - split-window -v
unbind ' " '
unbind %
# switch panes using Alt-arrow without prefix
bind -n M-Left select-pane -L
bind -n M-Right select-pane -R
bind -n M-Up select-pane -U
bind -n M-Down select-pane -D
# reload config file (change file location to your the tmux.conf you want to use)
bind r source-file ~/.tmux.conf; display-message "Config reloaded.."
set -g mouse on
bind V source-file ~/.tmux/layout1         #ctrl b + shift v => change
mkdir ~/.tmux
nano ~/.tmux/layout1
selectp -t 0 # select the first (0) pane
splitw -v -p 50 # split it into two halves


selectp -t 1 # select the new, second (1) pane
splitw -h -p 50 # split it into two halves
selectp -t 0 # go back to the first pane
常用软件#
sublime-text#
通过 apt 工具在线下载安装 Sublime Text,包括 x86_64 版本和 ARM 64 版本。
安装 GPG 密钥:
wget -qO - https://download.sublimetext.com/sublimehq-pub.gpg | sudo apt-key add -
确定 apt 可用 https:
sudo apt-get install apt-transport-https
选择一个可用版本:
稳定版本
echo "deb https://download.sublimetext.com/ apt/stable/" | sudo tee /etc/apt/sources.list.d/sublime-text.list
开发版本:
echo "deb https://download.sublimetext.com/ apt/dev/" | sudo tee /etc/apt/sources.list.d/sublime-text.list
更新 apt 软件列表并安装 sublime-text:
sudo apt-get update
sudo apt-get install sublime-text
中文输入法#
sudo apt install fcitx
sudo apt-get install fcitx-googlepinyin
reboot
点击桌面右上角输入法图标,点击 Configure
去掉 Only Show Current Language, 选中 Google Pinyin,OK
ctrl+空格切换
Firefox 浏览器调优#
MozillaFirefox,中文俗称 “火狐”,是一个由 Mozilla 开发的自由及开放源代码的网页浏览器。它自带于 kali 系统中,在使用之前我们需要对部分功能进行调整。
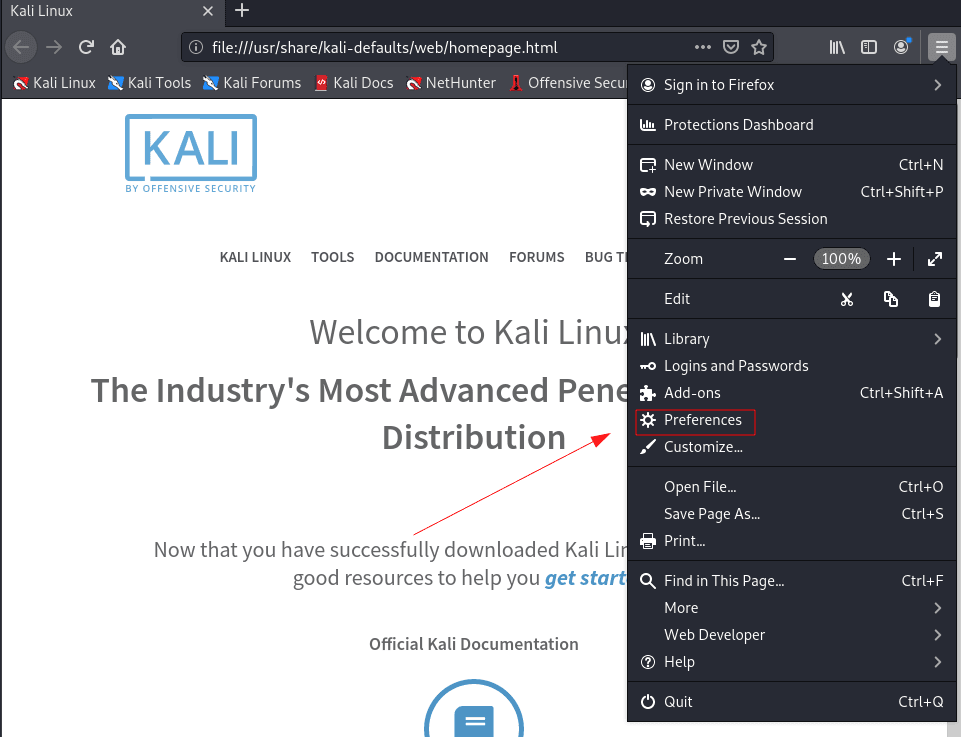
firefox 关闭 success.txt 及开启插件安装#
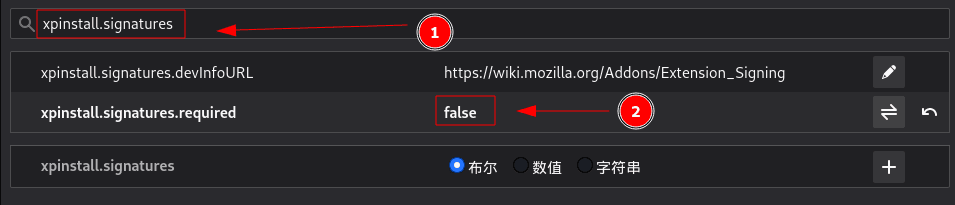
打开浏览器,在地址栏输入about:config
在 search 那一行输入 network.security.ports.banned.override,新建一个,选择字符串,值填写0-65535
在 search 那一行输入 xpinstall.signatures,将 xpinstall.signatures.required 那一行双击改为 false
更新 Firefox 浏览器#
在命令终端执行apt-get install firefox-esr命令可将 Firefox 浏览器升级到最新版本。
安装 Chrome 浏览器#
双浏览器更符合信息安全工作的需要,因此我们再加装一款谷歌浏览器。
apt-get install chromium
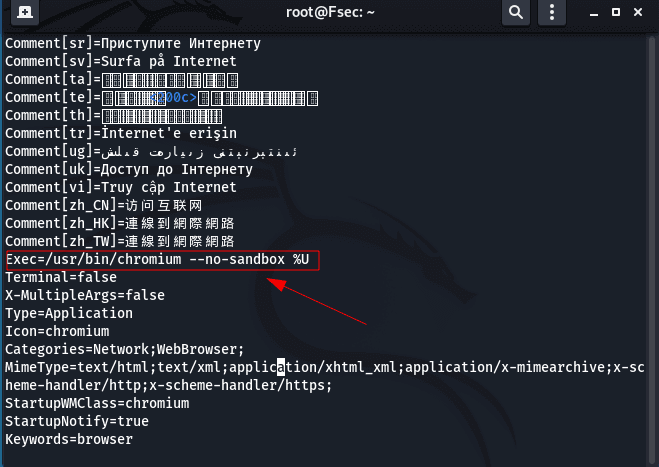
vim /usr/share/applications/chromium.desktop
Exec=/usr/bin/chromium --no-sandbox %U
执行vi /usr/share/applications/chromium.desktop命令后,将文本中Exec一行改为如下内容:
typora 需要执行如下命令:
wget -qO - https://typora.io/linux/public-key.asc | sudo apt-key add -
add-apt-repository 'deb https://typora.io/linux ./'
apt-get update
apt-get install typora
vim /usr/share/applications/typora.desktop
修改exec为:/usr/bin/typora --no-sandbox
flameshot 截图工具安装#
截图功能是编写学习笔记和渗透测试报告时所必须的,在 kali 中我们可以安装一款名为 flameshot 的截图工具。
安装:
sudo apt-get install flameshot
设置快捷键:
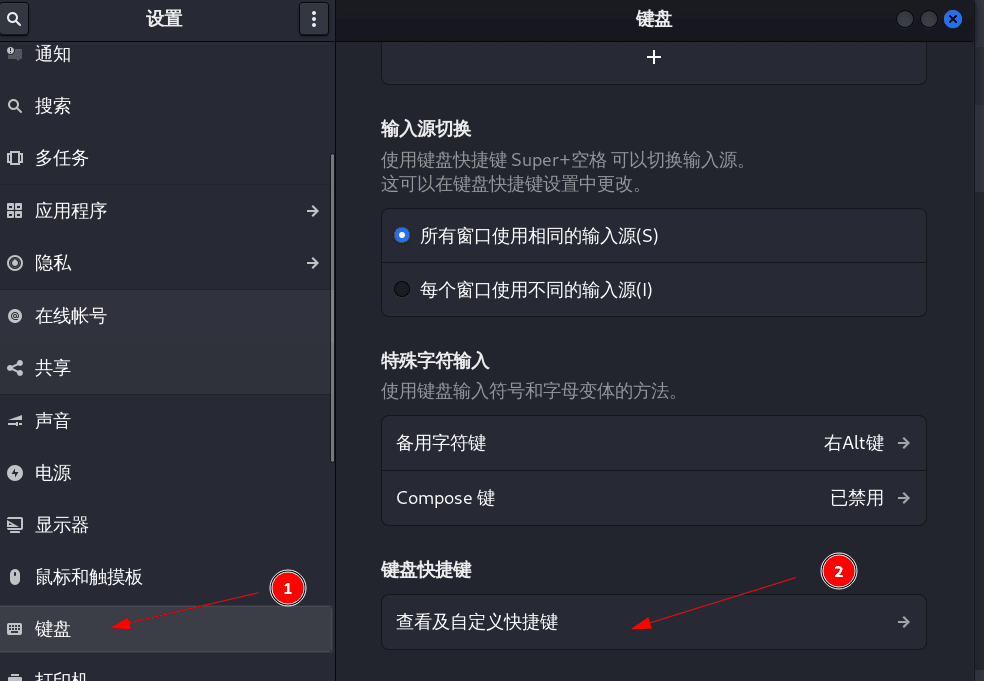
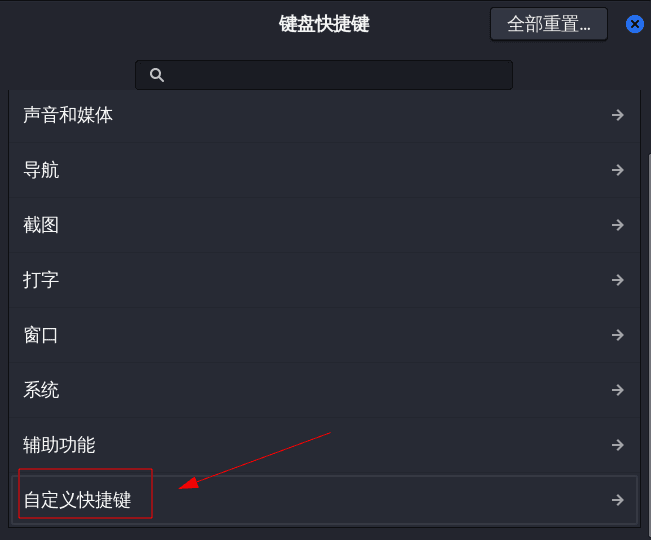
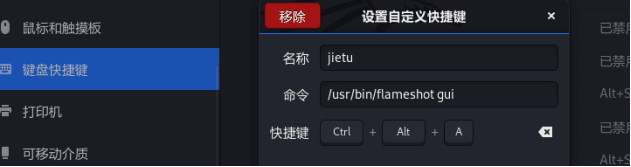
设置完成后,按Ctrl+Alt+A即可截图。
常用工具#
信息收集工具#
Rustscan#
Rustscan 是一个快速的端口扫描工具
去下载 deb 包 👉 https://github.com/RustScan/RustScan/releases
wget https://github.com/RustScan/RustScan/releases/download/2.0.1/rustscan_2.0.1_amd64.deb
在下载文件夹中打开终端输入dpkg -i
wget https://github.com/RustScan/RustScan/releases/download/2.0.1/rustscan_2.0.1_amd64.deb
chmod +x rustscan_2.0.1_amd64.deb
sudo dpkg -i rustscan_2.0.1_amd64.deb
安装完成
使用方式
rustscan -b 30 -a 目标 -q
feroxbuster#
sudo apt install feroxbuster -y
gobuster#
sudo apt install gobuster -y
steghide#
sudo apt install steghide -y
xray#
提权工具#
pspy#
在目标主机下载
- 32 bit big, static version:
pspy32download - 64 bit big, static version:
pspy64download - 32 bit small version:
pspy32sdownload - 64 bit small version:
pspy64sdownload
chmod 777 pspy64
./pspy64
linpeas#
https://github.com/carlospolop/PEASS-ng/releases/latest